Blender render time spender.
I was playing around with VisIt last summer as a part of my job. Someone then asked me if I can do 360 videos with the data. I answered no at the time. Fast-forward to the present. Turns out that yes, you indeed can do 360 VR visualisations with your scientific data. Neat, isn’t it? Well, at least I thought so and decided to give it a try. And well, here we are.
This is a tutorial of sorts about all the stuff I’ve learned. I’m assuming that the reader is completely new to Blender and maybe even a bit intimidated by it, like the author was. Hence for those Blender experts out there, this tutorial is very hand holdy.
The visualisation I’ve been working on is this VR animation of cosmic necklace network that consists of cosmic strings (green) and magnetic monopoles (red). More information on the system can be found from the video description as well as links to the scientific papers the simulation is based on. Now you can experience the possible events of early universe in VR!
I feel like I should state that doing VR visualisations is not very hard, it just
takes infuriatingly long to actually get it working. Here are eight easy steps how to do that.
1. Export data
Have your data in some form that is easy to import to Blender. I’m using stl but obj and other file formats will probably also work just as well. VisIt seems to recommend you to use ply format.
My data was a bunch of silo files so I first opened them in VisIt to get the isosurfaces I wanted for the visualisation meshes. So I had to export my whole database.
NB! VisIt doesn’t export your textures/colours for your meshes. So if you have for example two different isosurfaces (like I did, cosmic strings and monopoles) you can just export them into different files and then add materials for them in Blender. If this is not the case and you can’t export your differently coloured isosurfaces separately, good luck? Maybe don’t use VisIt…
NB! When trying to export stuff from VisIt be prepared for it to take around ~3 days to get all the data exported…
2. Open/Download/Update Blender
You should have at least release 2.78. Why this version you might ask,
- Denoising options.
- The script for rendering multiple timesteps that I’m going to introduce later uses commands that don’t work on previous releases.
- The options needed for VR movies to my knowledge don’t exist in the previous releases.
3. Startup file and materials
Skip this step if you’re already familiar with Blender. This bit includes how to add materials and such.
First, I’ll go through very briefly what my startup file looks like and what is essential. Then I’ll introduce how to add materials to objects, this is needed for the script to work like it should.
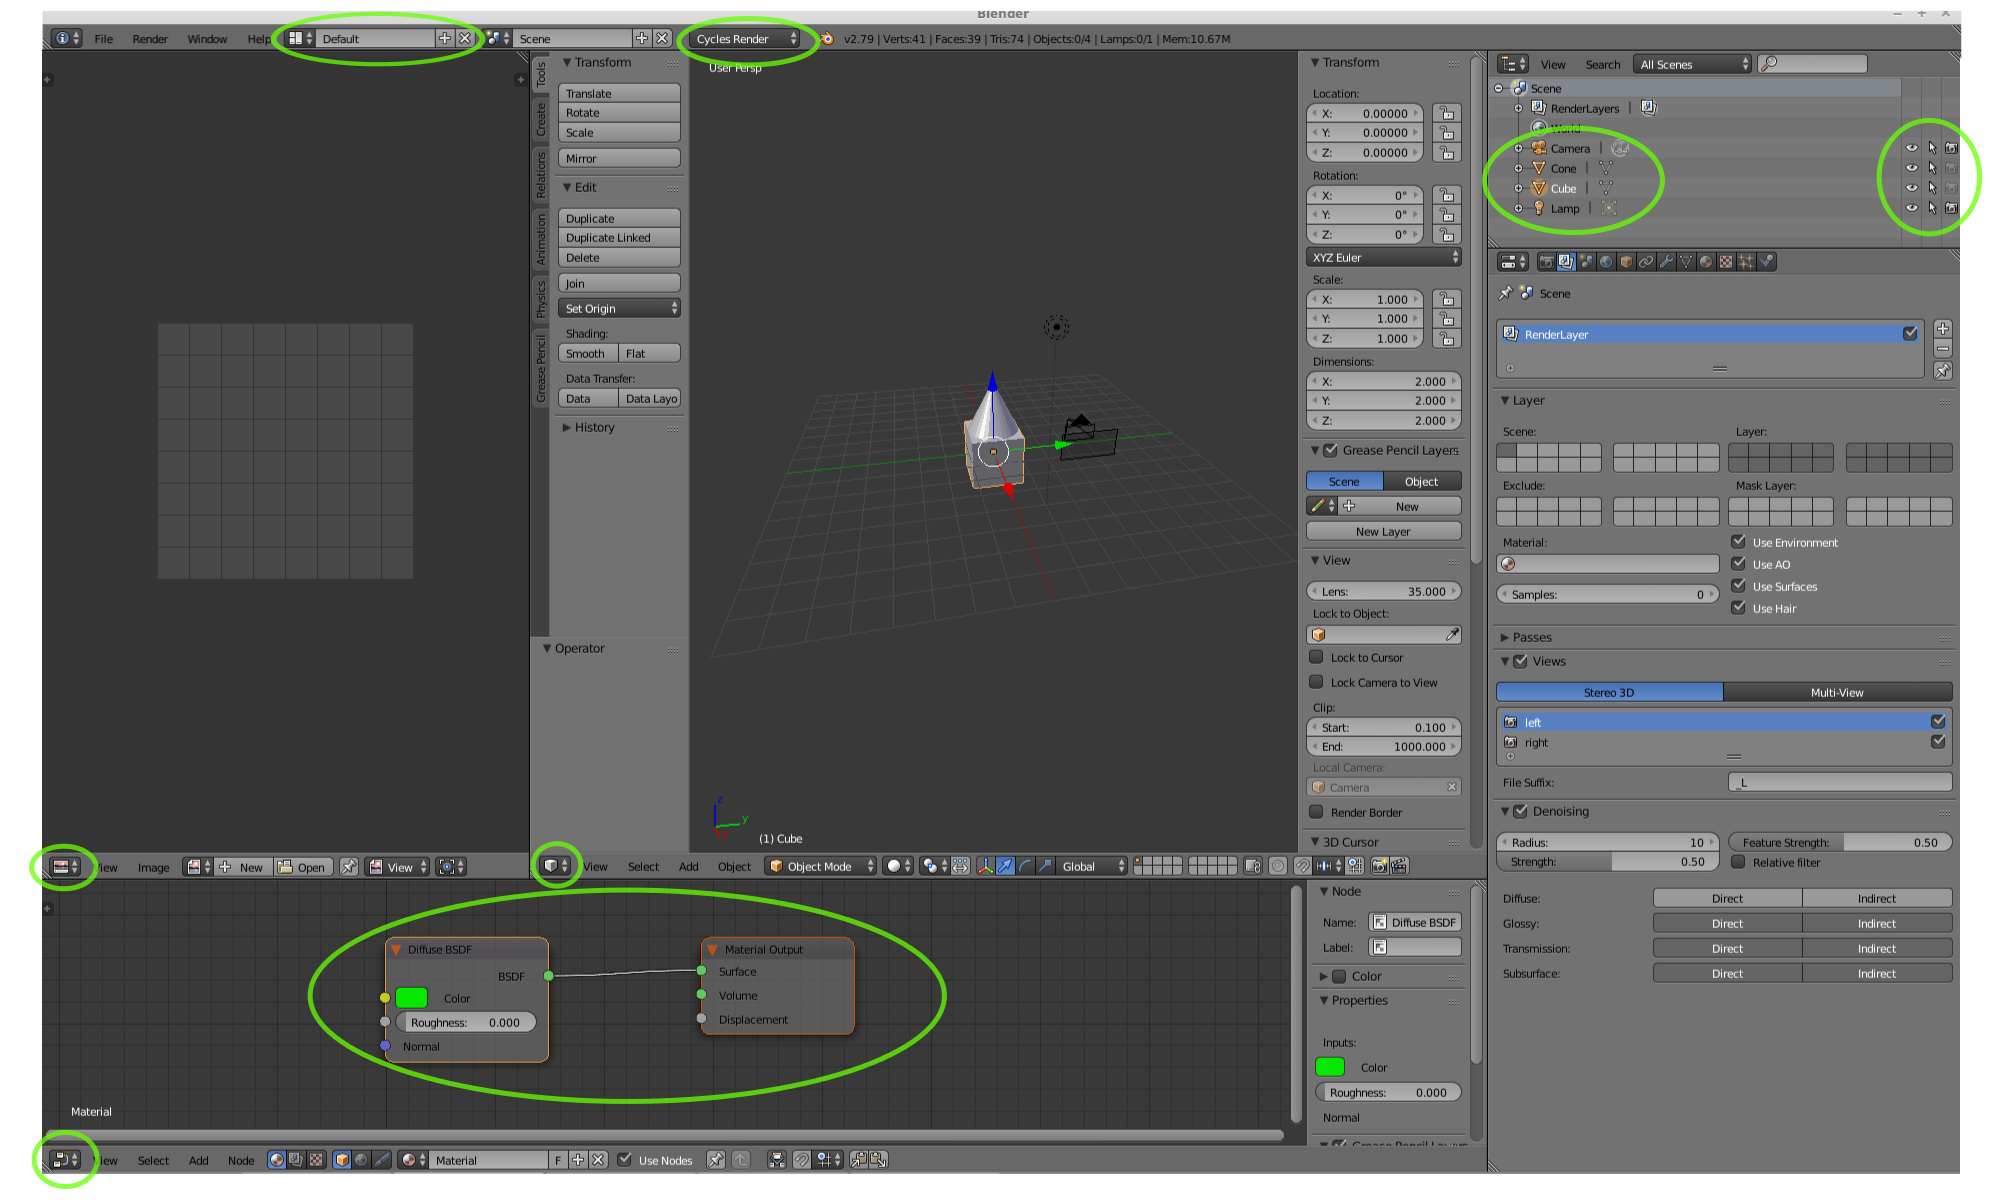
This is the start layout. Important stuff that you should pay attention to is highlighted in green.
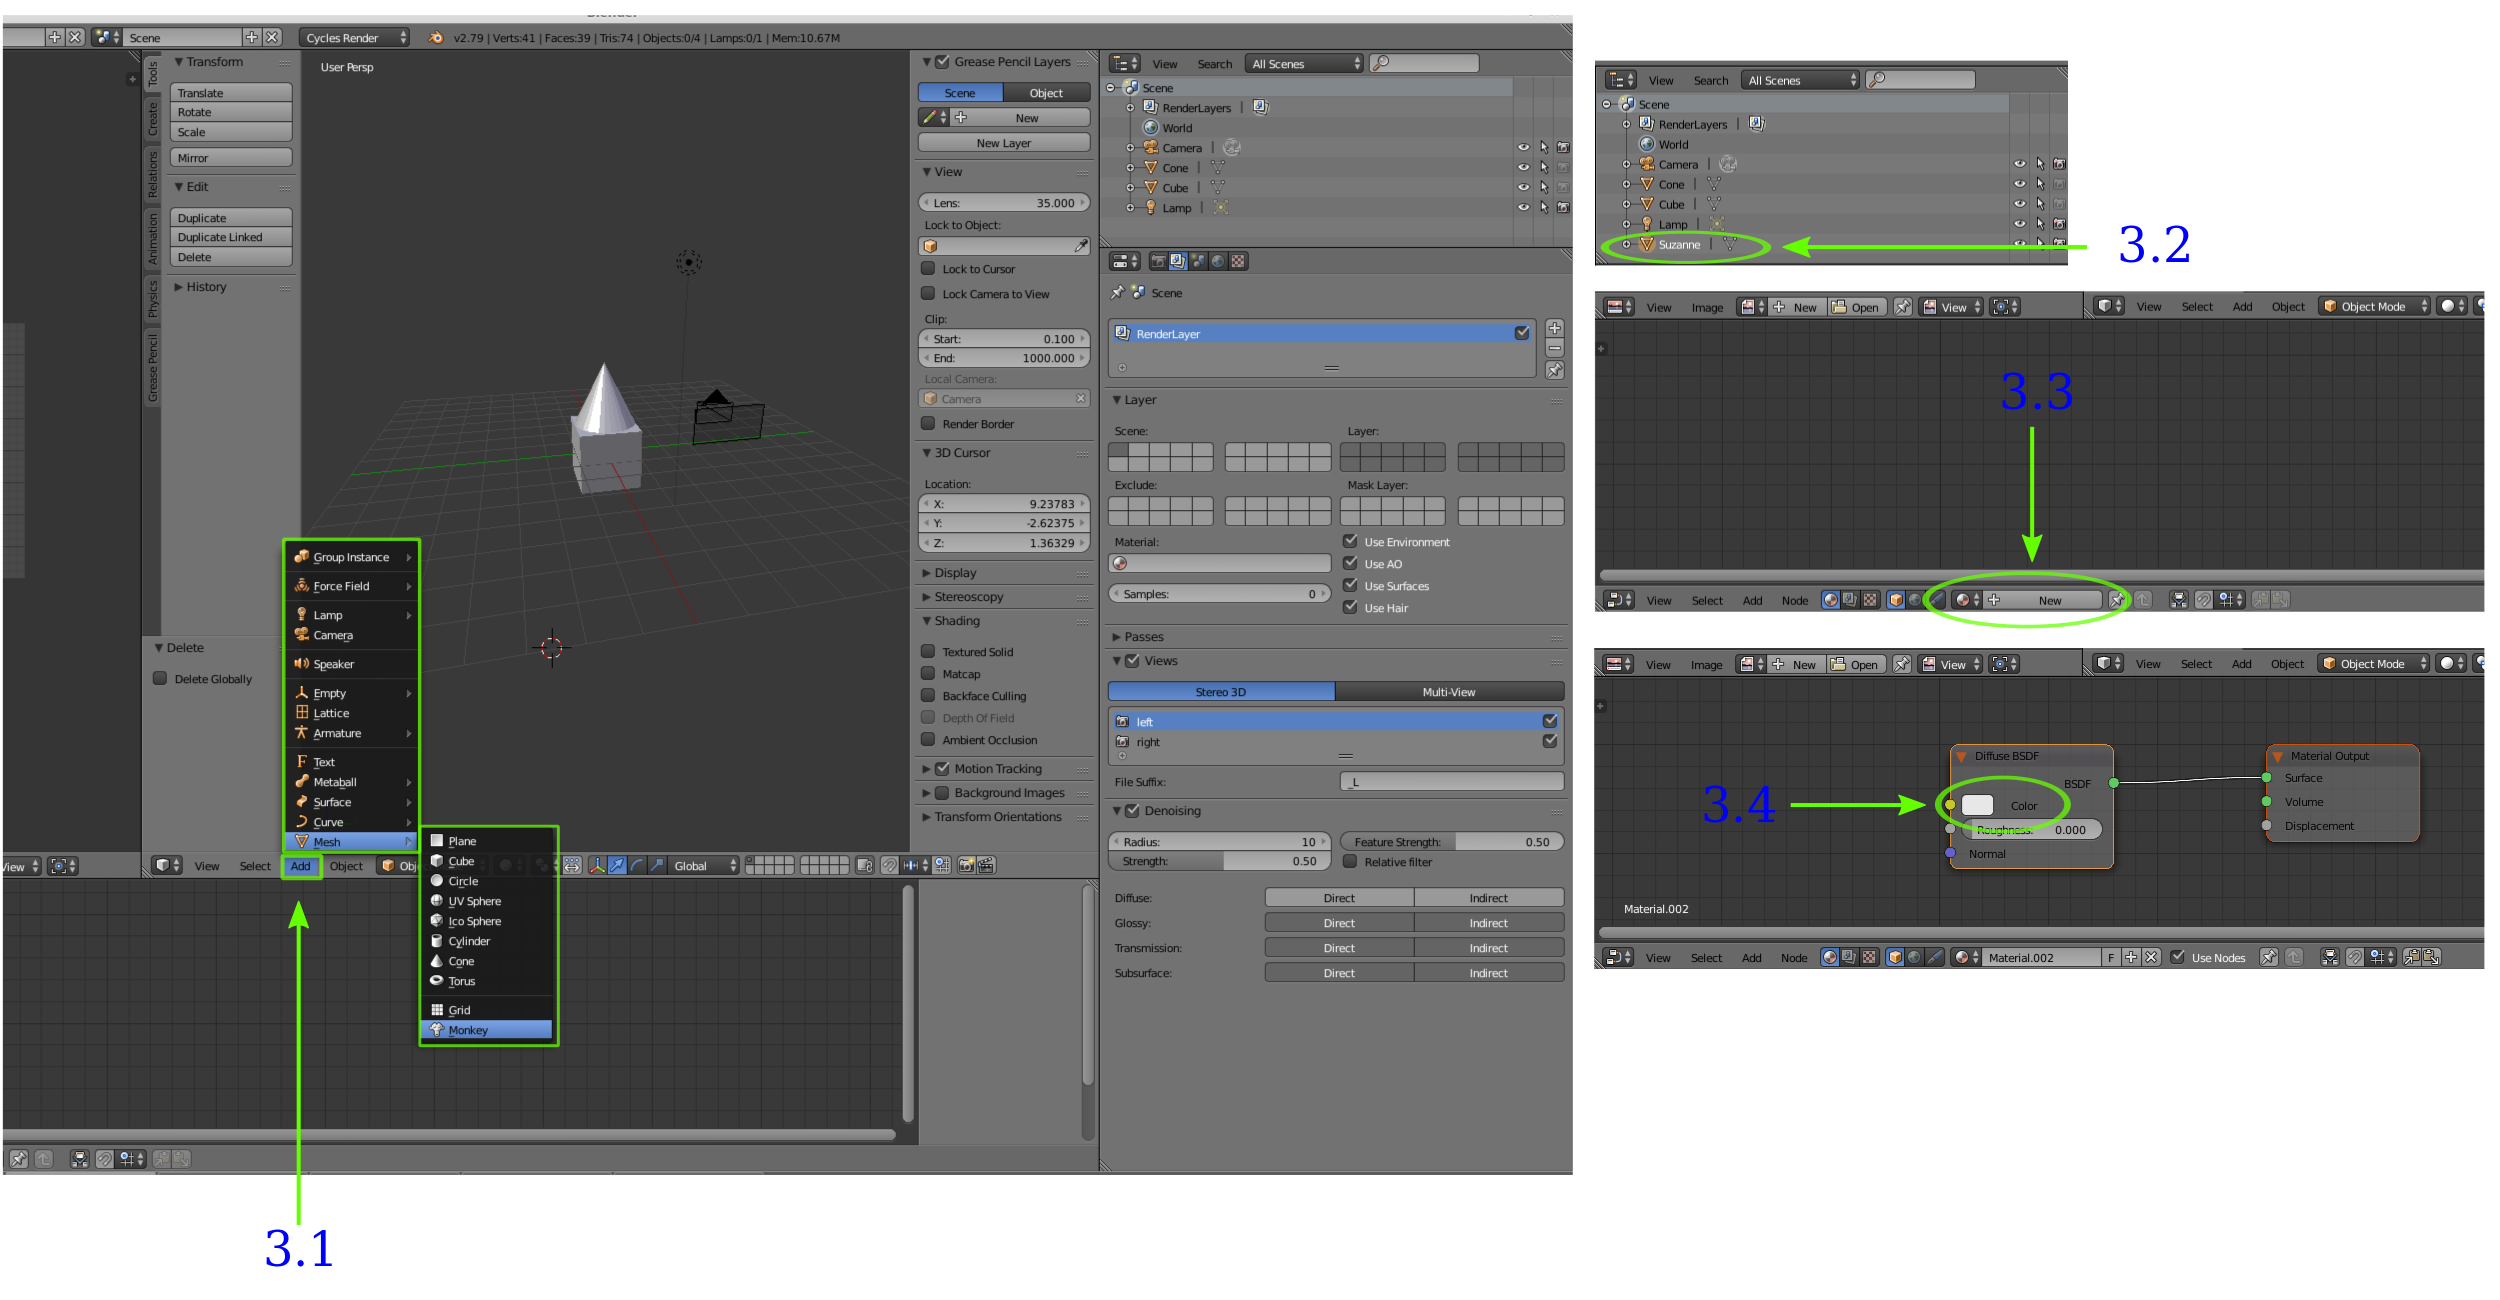
3.1: Let’s add a monkey mesh and add a material to it.
3.2: Select the monkey called Suzanne.
3.3: Add a new material.
3.4: Change the color.
4. VR movie options
Options you need to turn on for the VR animation. Here’s a link for a YouTube video that I used as a reference. It has more in depth explanations what to do and why. I heavily recommend to check it out.
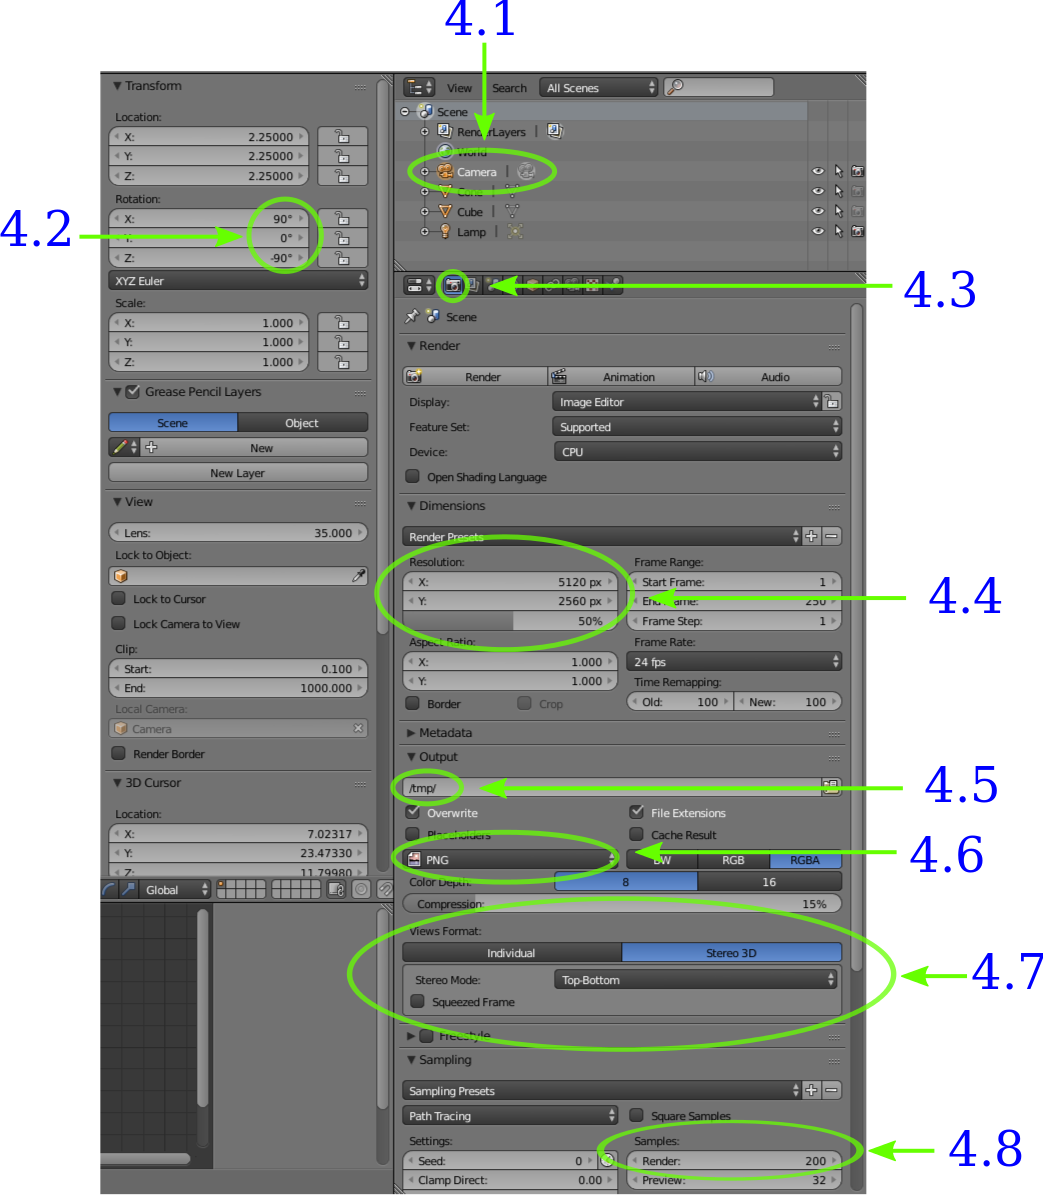
4.1: Select Camera
4.2: Change rotation to x=90, y=0 and z=-90
4.3: Render tab
4.4: Change resolution to at least 5120×2560 and the percentage scale to 90%
4.5: Choose the location where you’re saving the stuff (optional, the script will handle the saving)
4.6: Choose format (png, jpeg, etc.)
4.7: Views format should be Stereo 3D with top-bottom layout
4.8: In sampling adjust the samples render value, good value is something around 100-500
4.9: Render Layers tab
4.10: Enable views
4.11: Choose Stereo 3D
4.12: Enable Denoising. Choose Diffuse direct and indirect. Set radius to 10. Using denoising reduces the amount of samples. More information can be found here and here.

4.13: Object data tab
4.14: Change the perspective to panoramic and choose equirectangular
4.15: Enable spherical stereo
4.16: Not necessary but author heavily recommends, saves you from a lot of trouble if (and when) everything crashes, save the startup file (Ctrl + U)

4.17: That’s pretty much it. Now go back to the Render tab (4.3) and click the render button. Or if you want to render more than one frame use the script.
5. The script
Now we are finally ready to go through the script that renders multiple frames. For a 60s long 24fps video you’ll need 1440 frames. Note that this is by far the most time consuming step. With my desktop computer (4 cores, 8GB memory) one somewhat decent looking frame took 8h to render. So 1440 frames would take roughly one year and 4 months to render.. So hopefully your stl files are waaaay smaller than mine. The biggest problem with my desktop computer was the memory which then resulted in my computer doing a lot of swapping. Increasing memory might thus decrease the rendering time notably.
My solution in the end was to use a virtual machine with two GPUs, so instead of 8 hours one frame took around 5 mins. However, my initial visualisation run was 2.2 terabytes of silo data which also means that the stl files are around 900MB at their worst. But enough of this technical jargon, here’s the script and an explanation what it does.
Now we have to move from the default tab to the scripting screen layout. Here’s a screen capture what it should look like, and like previously all the important stuff is highlighted in green. Just open the script in the text editor and click run script and everything should now work.
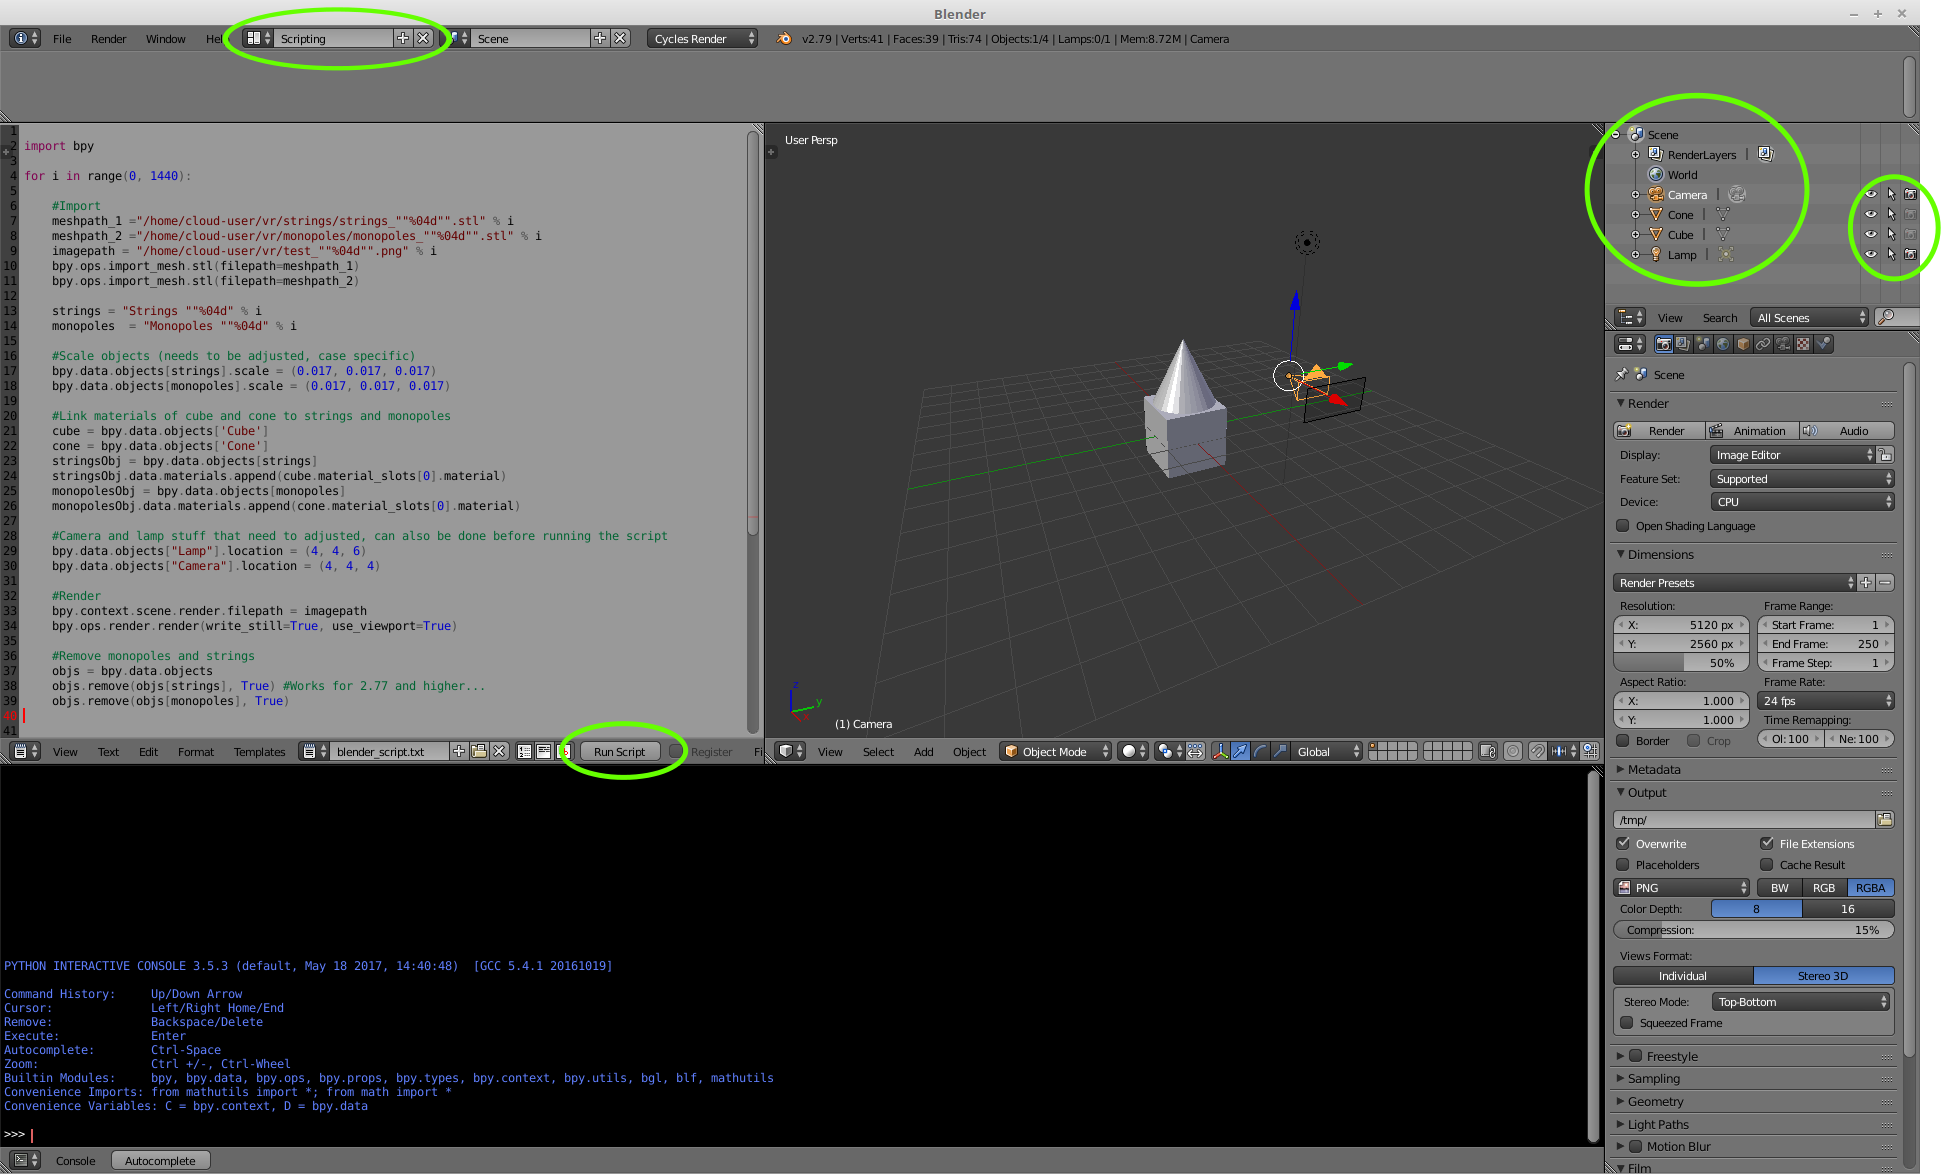
NB! The script works only if you have objects Cube and Cone in your session. Otherwise, it doesn’t get the materials assigned to the objects.
import bpy

for i in range(0, 1440):

#Path to files you need to import
 meshpath_1 ="/path/to/folder/strings_""%04d"".stl" % i
 meshpath_2 ="/path/to/folder/monopoles_""%04d"".stl" % i

#Location to save the frames
 imagepath = "/path/to/folder/frame_""%04d"".png" % i

#Import meshes
 bpy.ops.import_mesh.stl(filepath=meshpath_1)
 bpy.ops.import_mesh.stl(filepath=meshpath_2)

#Rename
 strings = "Strings ""%04d" % i
 monopoles = "Monopoles ""%04d" % i

#Scale objects (needs to be adjusted, case specific)
 bpy.data.objects[strings].scale = (0.017, 0.017, 0.017)
 bpy.data.objects[monopoles].scale = (0.017, 0.017, 0.017)

#Link materials of cube and cone to strings and monopoles
 cube = bpy.data.objects['Cube']
 cone = bpy.data.objects['Cone']
 stringsObj = bpy.data.objects[strings]
 stringsObj.data.materials.append(cube.material_slots[0].material)
 monopolesObj = bpy.data.objects[monopoles]
 monopolesObj.data.materials.append(cone.material_slots[0].material)

#Camera and lamp stuff that need to adjusted, can also be done
before running the script
 bpy.data.objects["Lamp"].location = (4, 4, 6)
 bpy.data.objects["Camera"].location = (4, 4, 4)

#Render
 bpy.context.scene.render.filepath = imagepath
 bpy.ops.render.render(write_still=True, use_viewport=True)

#Remove monopoles and strings
 objs = bpy.data.objects
 objs.remove(objs[strings], True) #Works for 2.77 and higher...
 objs.remove(objs[monopoles], True)
6. Frames into a movie
Now that you have the images for your movie, simply use ffmpeg or something similar – or use the video editing tool that can be found in Blender. Here’s quickly how to use the video editing tool.
Some suggestions: use MPEG-4 format with H.264 encoding, fps should be at least 24.
7. Upload to YouTube
Use the Metadata app. Instructions.
8. Congrats!
Enjoy your VR movie!
NB! I’m in no way a Blender expert so take my advice with a grain of salt.
And last but not least, I’d like to thank Jyrki Hokkanen from CSC who taught me how to use Blender and do this VR animation!