Create Zoom meetings directly within Moodle

Zoom is an online webinar service that is recommended for teachers to use in real-time online teaching, as well as when recording and streaming lectures. In Zoom, the teacher may give a mass lecture or assign students to small groups for collaborative work and discussions. The students may participate in Zoom through writing in the chat, or streaming their own audio, video, and PowerPoint presentations to the meeting. Zoom is a suitable tool also for creating pre-recorded teaching materials, such as PowerPoint lectures, shorter videos, or demo videos.

With the latest update, teachers can create the Zoom meetings for their courses through the Moodle area of the course! This way, the student – and teacher – finds all the course Zoom links from the same activity within Moodle. The Zoom meetings created through Moodle are also visible in the teacher’s www.helsinki.fi/zoom account’s meetings listing, and within their Zoom desktop app.

Directions

The following directions present the simplest way to create a Zoom meeting. In most cases, the default settings in Moodle provide the most suitable settings already and thus usually don’t need to be changed.

If you are creating the Zoom meetings through Moodle, please note that it is advisable to place all the Zoom meetings of the same Moodle area under one Zoom-activity in Moodle, visible on the Moodle course area’s front page.

Moreover, instead of multiple links per course, we recommend to create one Zoom activity in Moodle, and only one link for participation in the course – which you add to your Moodle area.

NB. Before you create the Zoom meetings in Moodle, please sign into Zoom at least once with your University of Helsinki login credentials, at www.helsinki.fi/zoom.

Adding a Zoom activity

  1. Navigate to your Moodle area within which you would like to create the Zoom meeting(s).
  2. Make sure that the editing mode is on in your Moodle area (gear icon dropdown on the right hand side corner of the page).
  3. Click Add an activity or resource and select Zoom video conferencingZoom Button


4. Provide a name for your Zoom session, for example “Join Zoom meetings on Tuesdays 1.10.-30.10.2020 between 10:15-11 AM”.

5. Save and display.

Create a Zoom room within a Zoom activity 

The example below describes how to create Zoom meeting(s) that can be used within the Zoom activity. These meetings are created similarly to how you would create meetings in zoom.helsinki.fi.

a) Open the Zoom activity that you created in Moodle.

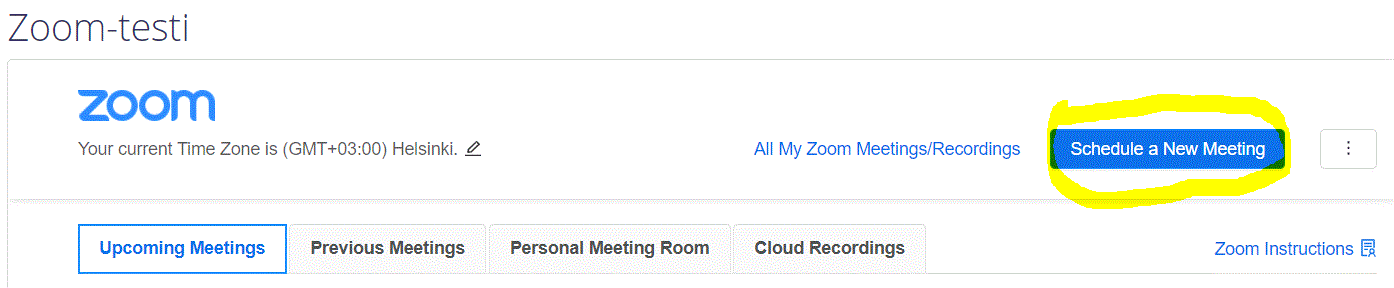
b) Click Schedule a New Meeting.

Schedule a New Meeting Button


c) Change the topic if needed, as an example: “Introduction to university studies”.

If needed, you might also utilize the advanced settings, e.g. the Description is visible to the student as they wait to enter the Zoom room.

d) Select Recurring meeting.

e) Select Recurrance = NoFixed Time (the course schedule varies or if you do not wish to indicate a particular time).
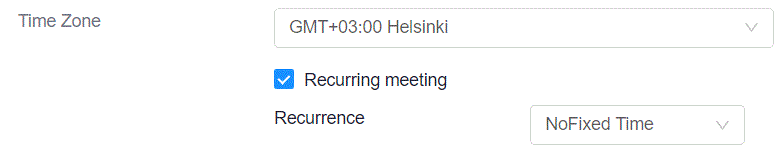
Select Recurrinf meeting & No Fixed Time

f) Click Save.

If you need to create more Zoom rooms for the course, navigate to the Zoom activity in Moodle and click Schedule a New Meeting. In other words, at this stage, there is no need to add another “New activity” in Moodle, rather just add another meeting into the already existing Zoom activity you created in the Moodle area.

When it is time to start the meeting, open the Zoom activity and as a teacher you start the meeting by clicking the Start button. Students join the meeting by clicking the Join button.

In the Zoom activity, a teacher can remove meetings by clicking the Delete button. A teacher can also edit the already created meetings by clicking the topic of the room and then clicking the Edit this Meeting button.


Further advice and links to use Zoom
    • The person who creates the Zoom meeting, is automatically assigned as the host of the meeting.
    • As a host, you can create break-out rooms and polls before the meeting starts. When you want to use the pre-assigned break-out rooms (groups) and polls, they need to be created through www.helsinki.fi/zoom.
    • If you are a host and have created multiple Zoom sessions at the same time, Zoom will not work. Typically this can be avoided, if the teacher creates the Zoom meetings that they will be teaching in.
    • If there are multiple lecturers in your course, think about the best solution for your course with Zoom. For example, the lecturer or course assistant, who is able to attend every lecture, should create and host the Zoom meeting for the course. The host can add visiting lecturers or technical support as co-hosts during the Zoom session. It’s also a good idea to add them as alternative hosts for the Zoom meeting in the Zoom settings in Moodle.
    • You can see a tab for Cloud Recordings in Moodle. At this time, the cloud recording function is not in use at the University of Helsinki. The Zoom files will be saved onto the recording person’s computer (typically host/co-host), if the recording is on. When the Zoom meeting ends, Zoom converts the file to .mp4 and after this, it is usable. For example, the video file can be uploaded to Unitube and from thereon, to Moodle. Cf. Guide for linking Unitube videos to Moodle.
    • The regular Zoom meeting function enables accepting up to 300 people to the Zoom meetings. If you need a larger meeting, please reserve it from Helpdesk.

More guidelines for Zoom

For support and Zoom training: edutech@helsinki.fi

Yammer-groups:

Learn Moodle Basics

Are you a new teacher at the University of Helsinki? Or do you need to recap and rehearse Moodle activities? You can get familiar with Moodle in many different ways, including:

Moodle Basics MOOC 

Learn Moodle Basics 3.9 starts on Mon 5th October and lasts for four weeks. If you are interested, please sign up here: learn.moodle.org. You will receive a reminder before the course begins.

The completion of the course is optional, so you can also participate to see the content of the course, and complete the assignments at your own pace.

The course Learn Moodle 3.9 Basics is a MOOC which means:

M = Massive – allows access to a very large number of participants.
O = Open to everyone.
O = Online – you can study remotely via the Internet.
C = Course – the course has a beginning and an end (a given period of time), it includes assignments, there are defined learning objectives, and there is some interaction between the course participants.

The Learn Moodle 3.9 Basics offers

  • ideas for how to use Moodle in a more versatile way in your teaching.
  • experience in studying with a MOOC.
  • a great opportunity to connect with a global Moodle community and share your ideas with other teachers who are using Moodle all around the world.
  • an introduction to the new Moodle version 3.9 (which the University of Helsinki will most likely introduce in January 2021).

The self-study course Moodle Basics (in Finnish)

The online material Moodlen perusteet is within Moodle. If you are a teacher at the University of Helsinki and know some Finnish, please register for the course.

Moodle: Basics (in Finnish)

Location: Online (Zoom Webinar) Central campus
Time: Tue 18th August, 2020 at 2.15 – 5 PM.
Enrollment and more information in SAP Suffeli Learning.


NB. If you wish to have training in some other topic, or in English, please feel free to contact us at moodle@helsinki.fi. We are happy to provide customized consultations and trainings!

Save

Save

Save

Save

Save

The new version of Moodle brings innovations to the Forum

Moodle will be upgraded from June 23rd to 24th, 2020. During this time, Moodle is closed and cannot be logged into.

The new version 3.8 of Moodle will be launched on June 24, 2020. The update brings a number of new features, especially to the Forum activity.

Forums

The summary report provides an overview of all the participants and their activities in the forum area. You’ll find, for example, the number of discussions posted, the number of replies, the number of views, and the number of word and character count for each student. The view can be filtered for a limited time period or by groups.

Through the whole forum grading, the teacher can grade each student’s performance on the forum as a whole in addition to individual posts. The user interface is largely similar to the grading of Moodle assignment.

The new export function allows you to download the entire or more limited content of the forum in different formats.

Record audio & video

Moodle has new features that enable recording of video and audio directly in Moodle which enables, for example, an easy way of giving feedback to students and submission of assignments by students. These features are available everywhere in Moodle where the text editor is in use. Recording length has been limited to 2 minutes. The purpose of the limitation is to avoid filling up Moodle’s storage capacity and direct storing of longer recordings to dedicated services such as Unitube or OneDrive. The recorders use your device’s microphone or camera and work, for example, with a smartphone’s browser.

Emojis

In addition, you can now add emoijs to all content. The Emoji icon can be found both next to the message field and in the default Atto editor.

Contact us

  • You can ask questions and give feedback about the update at moodle@helsinki.fi
  • More Moodle guides: MoodleDocs
  • See upcoming Moodle trainings in SAP Suffeli.

Using Moodle to support your online teaching

Moodle as a Learning Management System (LMS) and an elearning environment

Moodle is a versatile elearning environment that can be adapted for a wide variety of online teaching purposes. Moodle can be used to support classroom teaching / face to face teaching, blended learning, or as a platform for distance learning.

Within Moodle, the teacher can create assignments for the students as well as receive and grade the assignment submissions.

A number of elearning tools are available within Moodle, and the selection of a particular activity type or tool depends on the learning goals and the teaching and learning methods of your course.

What is Moodle?

If you are not familiar with the elearning environment Moodle, please see the following introduction video: What is Moodle?

You may also consider familiarizing with these Moodle self-study modules. 

How to create a Moodle area for your course

You can order a new Moodle area in two different ways:

  1. With the course area request form, which you can find at moodle.helsinki.fi  (before you login) —> instructions for teachers —> Request a new course area.
  2. Or, you can create a Moodle Course area at the Course pages site (courses.helsinki.fi). If you create a Moodle course area through the Course page, your students will be automatically added to Moodle if they have registered for the course in Sisu. Cf. guidelines: Creating a Moodle area that is automatically connected to your Sisu roster

After your Moodle course area has been created, you will receive an automatic notification in your email, which includes a link to your Moodle course as well as instructions for how to open the course to students.

Lecture teaching

Contact teaching lectures can be substituted for example by providing the students with e-materials, articles and other learning assignments, for example assignments in which the students are looking for materials themselves. The students can also share materials with each other through Moodle, for example on the discussion boards through the Forum or Glossary tools.

Teacher’s Moodle guide:

Other guidelines:

Sharing videos

The recommendation is that any lecture and instructional videos that you have created yourself, can be shared to Moodle from Unitube (the University of Helsinki’s video publishing platform).

Cf. teacher’s Moodle guide:

  • Linking Unitube videos to Moodle
  • Linking Youtube-videos to Moodle: Navigate to the Moodle editor, write the placeholder word (e.g. “video”), highlight this word, click the link-icon on the editor, and copy-paste the selected URL from either Youtube of Vimeo. (We recommend Vimeo Pro since it does not have ads, but also a private Youtube or Vimeo basic account is also OK.)

Assignments, e.g. literature reviews and essays

With the Assignment-tool within Moodle, the teacher can give the students assignments and the students can submit those through Moodle for the teacher to be graded. The teacher can grade the assignments and give feedback through Moodle, as well.

Teacher’s guide: Assignment quick guideAssignment activity guide

Exams

Consider whether you could substitute an exam with a final essay or a so-called home exam/materials exam, in which the students could utilise materials such as literature and the Internet to answer the questions. In this case, try to create questions that utilise tasks of applying and processing knowledge, instead of mostly memorising knowledge. An exam in Moodle can be created in two ways:  with the Quiz and the Assignment tools.

It is also possible to send the submissions to the Ouriginal (Urkund) plagiarism detection program.

See also: What makes a good remote examination

Assignment activity

Essay final papers and exams and other forms of assignment submissions in which the student submits an assignment in writing is recommended to be done with the Moodle Assignment-activity.

Teacher’s guide:

Quiz activity

When you would like to randomise or vary the questions that the individual students receive to be answered in the quiz/exam, the best way is to utilise the Moodle Quiz tool. First, create the questions in their relevant category within the Moodle area’s question bank. Then, you can create the Quiz activity itself, and draw questions from the question bank. The Quiz questions can be randomized for each student to vary the questions they receive.

With the Quiz tool, you can also create many other types of questions to be automatically graded, including multiple choice questions, word match, or cloze questions.

Typically, the exams are time restricted so that after the exam time is over, the questions will close and thus not be visible to the students anymore. If possible, consider setting the exam submission time to be flexible so that the exam itself allows for example a 2 hour time period to be answered, but this exam time can be started anytime within – for example – a 6 hour time period.

Exams for over 100 students

  • Inform the students that as they start the quiz or exam, there may be a traffic jam in Moodle. In this event, the student should wait a few moments and then refresh the browser to reload the quiz page.
  • If possible, set the exam to be available for multiple hours and then restrict the timeframe of the exam answering.
  • Inform the students that they should prioritize doing the exam with a laptop rather than a mobile device.

Other exam options

Communication and online discussions in Moodle

You can use the Announcements forum in Moodle when you need to communicate something to the students urgently and you need to be able to reach the students immediately. The Announcements forum will send a push notification to the students’ emails. Please note that the students cannot respond to Announcements.

If you would like to send a message to your students through Moodle, which allows them to respond, as well, you may use the Forum activity.

Teacher’s guide:

Group work in Moodle

To utilise the tools in Moodle that function with the group settings, you need to first create the groups in Moodle. After this, you may utilise the created groups with for example:

  • Group discussion boards
  • Chat
  • Submitting a group assignment through the Assignment activity
  • Wiki for example to create a group work, but note that only one person can edit at any once time

Teacher’s Moodle guide:

Other possibilities:

More information

Support

Moodle trainings in spring 2020

Welcome to Moodle trainings and clinics!

In English:

More trainings and advanced courses are in Finnish, see here.

Enrollment and more information in SAP Suffeli Learning.

NB. If you wish to have training in English or in some other topic please contact moodle@helsinki.fi.