By making your courses accessible, you will not only make the content easy to access for students with learning difficulties and disabilities, but also, as a nice side effect, your courses will be clearer and offer more options for everyone. This idea derives from the Universal Design for Learning (UDL) framework. Some of the UDL guidelines that I find most useful are to use multiple media for communication, to optimize individual choice and autonomy, and to use clear and simple language (clear instructions will be appreciated by all of your students!). I’ve also found the University of Helsinki’s page on Recommendations for teachers concerning special situations extremely useful – I recommend reading it in full and thinking about ways you could better support students with any learning difficulty.
You are probably already following some of the UDL guidelines and the recommendations for special situations in your teaching already – and if you aren’t, you can modify your existing course materials and activities to make them accessible. For example, you can allow students to choose how they access and produce content – in written, visual, and aural modes (if possible). Another good practice is to only include videos with subtitles in the target language (and podcasts with written transcriptions) – you will not only be supporting students with listening impairments, but also students with weaker listening skills. Plus, since subtitles can be toggled on and off, you can empower students to pick the strategy they use with any given video (e.g., first watch with the subtitles on, then rewatch the video with the subtitles on).
If you make videos for your courses, but they don’t have subtitles, no worries! The IT Help Desk has instructions for adding captions to videos using the Screencast-O-Matic tool, which has automatic captioning. I’ve also used Flip, a video-sharing tool that is integrated with Microsoft Office 365 – it’s also a great option for creating videos with subtitles. Adding subtitles to videos is much easier and faster than it used to be – just let the automatic transcription tool do its work, then watch the video and make manual corrections to the subtitles.
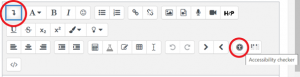
Moodle makes it easy to check that your content is accessible – just click the down arrow (first box on the left-hand side of the text editor), then click the Accessibility checker icon (the person in the circle). It will tell you exactly what you need to change to the text to make it accessible.
Here are the main things I kept in mind when I made my Moodle pages accessible:
-
- Use headings instead of other text formatting, like bold and underline, to organize content in labels and pages. This means that you need use Heading 1, the largest, for the top level of content, then use Heading 2 for subheadings, and so forth). This makes text much easier for screen reader (the device that visually impaired people use to read text on the screen aloud) users to navigate.
- Avoid italics (they tend to be more difficult to read).
- Bold can be used – in moderation – for emphasis.
- Avoid colored fonts since they will not be meaningful for colorblind students, and can be distracting for people with dyslexia – stick with black.
- When you add an image, make sure to add a clear description (unless it’s purely for decoration) – Moodle now requires you to add a description by default, so imagine that you are visually impaired. What textual description would convey the content best? This only requires extensive thought and work if you’re presenting a detailed diagram.
- Attachments also need to be accessible – avoid images with extensive text and scanned PDF uploads of written documents if possible, since they won’t be legible to screen readers. Instead, when possible, create a page in Moodle with text, or attach a Word document or PowerPoint document – both of which are accessible to screen readers.
- When adding a link, don’t paste the URL in the body of the text (this is a nuisance for screen reader users) – instead, you should describe the link in writing, then use CTRL+K to add the URL as a hyperlink (as I did earlier in this post to link to the captioning instructions).
- Most H5P interactive activities have been designed to be accessible, but you should visit the H5P Content Type Accessibility page to check that the activities you use are ok.
Of course, it’s not always easy to know which tools and design choices will make our online material less accessible. Let your students know that they should contact you if they have difficulty accessing anything in your course, and make it clear that you want their feedback in order to make improvements. Be in touch with students with specific needs – if you have a student who uses a screen reader, for instance, check with them before planning an activity around a particular tool. When I had a visually impaired student, I learned that Flinga is not accessible to screen readers while Presemo is, so I converted any tasks that used Flinga ahead of time.
Dedicate some time before your next courses start to updating your existing Moodle pages and online materials – once you’ve made the necessary modifications, you’ll be in the habit of following the accessibility guidelines whenever you design a new course and you’ll find it comes quickly and naturally. Good luck!
Edie Furniss
English language University Instructor