On this page, we will look at the following features in word processors:
- language settings
- hyphenation
- spelling and grammar check
- automatic correction and formatting
- accessibility
Language settings
Word processors often recognize languages automatically regardless of which language the program itself is set to. Moreover, you can often install language files in addition to the default language files that the program comes with. Language files are used for spelling and grammar checks.
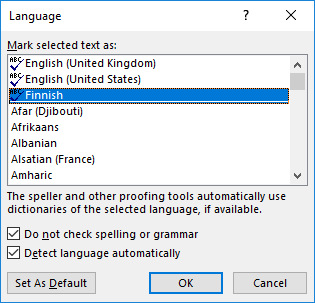
With Word, you will find the different language options by opening the Review tab. Choose the language of your document by clicking the Set Proofing Language button in the Language tool group. The languages installed into the program will be shown in the language list. If you choose the correct language, the spell checker and other language features can check the language based on the correct dictionary. The ABC icon beside the name of a language means that there is a spellchecker installed for that language.
Hyphenation
You can set the automatic hyphenation feature for a document, or you can insert hyphenation manually.
Automatic hyphenation
With Word you can set automatic hyphenation on the Page Layout tab and the group Page Setup. Click on the button Hyphenation and select Hyphenation Options. Tick the box for Automatically hyphenate document Accept by clicking on OK.

Manual hyphenation
With Word, set the manual hyphenation by going to the hyphenation window as described above (see image above) and clicking on the Manual button. With this setting, the program will stop at each word that needs hyphenating and suggest a place for the hyphen:
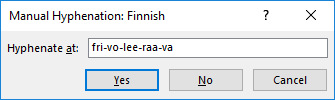
You can accept the place for the hyphen by clicking on Yes or reject it by clicking on No (the word will not be hyphenated at all). You can also place the hyphen where you want it and click on Yes.
If you want to allow the word to be hyphenated in a specific place (for example, infer-ence), you can create a hyphenation tip. The hyphen will only appear if the word is broken off at the end of a line. To create a hyphenation tip:
- Move the cursor to the place where you want the program to hyphenate the word.
- Click on CTRL + hyphen. The tip will be shown in the word as the ⌐ character. Click Show/Hide to display this character, as well as many other characters that are usually hidden.
![]()
Non-breaking hyphens and spaces
Non-breaking hyphens are used when wanting to prevent that a hyphenated word or number is broken up on two lines. The number 040-1234567, for example, might be broken up on two lines if it happened to come at the end of a line, but the non-breaking hyphen keeps the digits together. You can make a non-breaking space on the same principle, to keep two words with a space between them on the same line (e.g. 34 €).
With Word, you can create a non-breaking hyphen with the key combination Ctrl + Alt + hyphen, and a non-breaking space with the key combination Ctrl + Alt + spacebar.
Spell checking
Most word processors have a built-in spell checker that will check the spelling in your document. In fact, the spell checker often consists of two programs: the automatic spell checker and a spell checker that has to be started manually.
Automatic spell checker
With most word processors, the automatic spell checker checks the spelling while you are writing; if you make a spelling mistake or write a word that the program does not recognize, a red wavy line will appear under the word. The red line is only visible on-screen, not on a print-out.
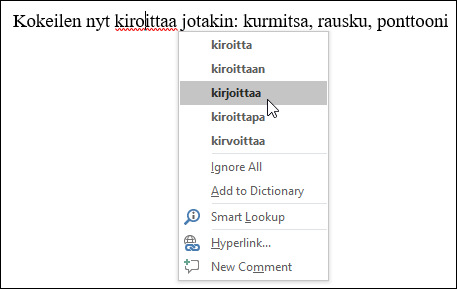
When you want to correct a word that the spell checker has found, do it manually or click on the rod with the secondary mouse button and choose a suitable correction from the pop-up menu. If the word is spelled correctly but the program does not recognize it, select Add to Dictionary from the menu. The program will then recognize it next time it appears in a text. An image of the pop-up menu below:
You can turn off automatic proofreading as you type and proofread the text when it’s complete:
1. open the File tab.
2. In the window that appears, click Options and open the Proofing tab.
3. Uncheck the setting Check spelling as you type.
4. Start the spellcheck with the Spelling & Grammar button in the Review tab.
A wavy green line can also appear under a sentence. This means that it may contain a grammatical error. Click on the sentence with the secondary mouse button to see a description of the error. Please keep in mind that one thing may be expressed in many different ways, and they may all be grammatically correct, so take the suggestions with a pinch of salt and use your own discretion.
Spelling and grammar
If you wish, you can run a spelling and grammar check after you have finished writing the document. The program will then read through the document and compare the words in it to the words in the program’s dictionary. if a word is not in the dictionary, the program stops at the word and offers you the opportunity to correct the word or add it to the dictionary. If you do not want to add the word, you can pass it by.
To start the spelling and grammar check with Word, place the cursor where you want to start the checking and then open Tools and select Spelling and Grammar. A checking window like the one shown below will appear on your screen:
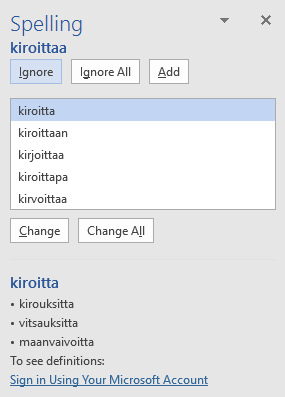
When the program finds an unknown word:
- If the word is spelled correctly, click on Ignore Once or Ignore All; the program will skip the word. Or click on Add to Dictionary; the program will add it to its dictionary and recognize it the next time.
- If the word is spelled incorrectly, select the correct spelling from the list in the menu window and click on Change.
- If the list does not contain the correct spelling, correct it in the box Not in Dictionary and click on Change.
When the spell check is complete, the program will tell you so. You can stop the check any time by clicking on Cancel.
Automatic correcting
There are several automatic correction and formatting features in word processors. They correct the text while you are writing it. Sometimes these features can make your work more difficult, but you can turn them off in that case.
Automatic correction
In Word, you can view the settings for automatic correction by clicking on Optionson the File tab. To access the proofreading settings, click the Proofing button. Then click Autocorrect Options. The settings window will appear on-screen, where you can change the correction settings as desired:
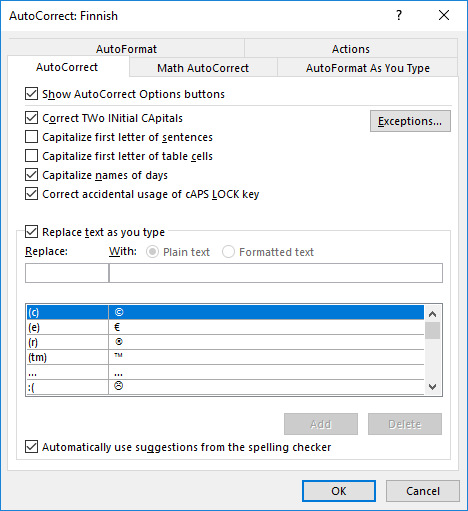
The alternatives above explained:
- Correct TWo INitial CApitals automatically corrects a word where you have written two capitals at the beginning by mistake.
- Capitalize first letter of sentences automatically changes the first letter after a full stop to a capital letter.
- Capitalize first letter of table cells starts the first letter in the first word in a table cell with a capital letter.
- Capitalize names of dayswrites the names of days with a capital letter.
- Correct Accidental usage of CAPS LOCK key changes small letters to large ones if you have forgotten the caps lock on.
- Replace text as you typefixes common spelling mistakes while you are writing. You can scroll down the word list and see the words that will be fixed automatically. You can also remove any word that you do not want the program to correct; to remove it from the list, select it and then click on Delete. If you want to add a word to the list, write the word you want to replace in the box Replace and what you want to replace it with in the box With, then click on Add. You can use this feature for words that you often misspell.
If you often write a long and complicated piece of text – like the name of a university faculty – you can utilize the automatic correction by writing an abbreviation in the Replace box (like uni) and the long text in the With box, so that the abbreviation will be replaced with it (e.g. University of Helsinki). Then you will only have to write the abbreviation in the text each time you need the longer piece of text, and it will be inserted automatically. Take care not to use abbreviations that mean something else, though.
Automatic formatting
There are various automatic features in word processors for formatting e.g. headings as well as numbered and bulleted lists.
With Word, modify the settings for automatic formatting by going to AutoCorrect Options (see “Automatic correction” above), and going to the tab AutoFormat As You Type. Add or remove the ticks for the features you want/do not want the program to format automatically.
Below is a list of features that cause the most problems; decide for yourself whether you want them to be active or not.
- Hyphens (–) with dash ( ): this feature also changes hyphens at the start of words to dashes.
- Automatic bulleted lists: this feature changes dashes or stars to bullets after pressing Enter
- Automatic numbered lists: with this feature, the program will format you text as a numbered list if you write 1. and then some text, and press Enter.
Accessibility
You can also use Word to find accessibility issues: choose File – Check for Issues – Check Accessibility