
On this page, we will look at the following issues concerning the compilation of a slide show:
- selecting settings for the slide show
- inserting slides into the slide show
- selecting the layout of slides
- entering text into slides
- slide-show fonts
- indentation levels of lists
- deleting a slide from a presentation
- reordering slides
- using images in slide shows
Slide-show settings
With the slide show settings, you can tell the program what kind of presentation you are making. It is best to specify the settings before starting to enter data into individual slides. In PowerPoint, you can find these settings on the Design tab in the Customize toolbar group (see image below) under Slide Size.
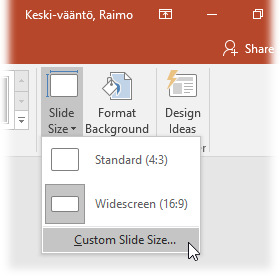
The figures in parentheses indicate the aspect ratio of the presentation display, most often 4:3 in a presentation projected on a canvas. For a presentation shown on a computer or television screen, you should select widescreen (16:9) as the aspect ratio. Accept the settings by clicking OK.
You can make more detailed choices by clicking Customize Slide Side in the same menu.
Inserting slides into the presentation
After starting a slide-show program, you can usually start editing a new show directly by editing the empty slide on screen. Then you can add different slides to the presentation.
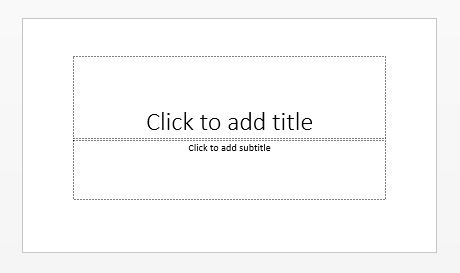
If there is no new slide on-screen, you can create a new slide show in PowerPoint by clicking on the File tab in the top left of the program. Select New from the menu that opens. The program will show a new, blank title slide and you can start to create your presentation. An image of the title slide below.
With PowerPoint, you can add more slides to the presentation by clicking on the New slide icon on the Home tab.
You can easily move from one slide to another with the wheel on the mouse. Alternatively, you can use the PageUp and PageDown keys to move between slides.
Slide layouts
Most slide-show programs offer both ready slide templates (Slide layout) and the possibility to create your own layout for the presentation. Some slide layouts have a place for title and text, while others have places for e.g. titles and images.
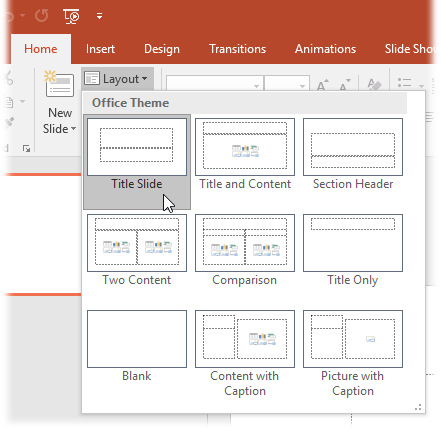
With PowerPoint, for example, you can select the layout among many ready-made templates. The following image shows a few slide structures of PowerPoint: “Title Slide” on the top left of the presentation, “Title and Content” next, then “Comparison” slide and “Title Only” on the middle row.
The layout of each slide in a presentation may be different. You can also alter the layout of any slide at any time. With PowerPoint, you do this as follows:
- Select Layout from the Slide group on the Home tab, as shown above.
- Select the layout you want from the menu that opens. The layout of the slide will change according to your wishes.
Entering text into a slide
It is easy to enter text into a slide at the placement mark on the slide. The placement mark is a text frame, so we will also call it a frame here.
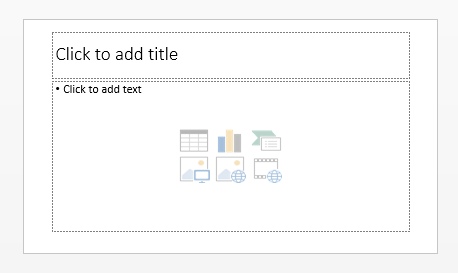
To enter text with PowerPoint, click on the text Click to add title or Click to add text according to which kind of text you would like to enter.
When you enter text into a slide, it will be wrapped automatically. You can start a new line or paragraph by pressing Enter.
Slide-show fonts
Use common fonts like Calibri, Arial, Times New Roman, Courier New, etc for your presentation. When presenting a slide show with a computer, it is best to use sans-serif fonts. The recommendation for posters, tables, etc is sans-serif fonts or grotesques, such as Calibri, Arial, Helvetica and Futura (For more information about fonts, see chapter P.1 Common types of data presentation – Text).
Fonts with serifs, or antiquas (such as Times, Times New Roman and Century Schoolbook) are easier to read in a smaller font size, so they are more often used in longer, hard-copy documents.
Indentation levels for lists
Slide-show texts are often presented in the form of lists. If you are using a list format, you will often need a multi-level list structure.
With PowerPoint, you can set the indentation as follows:
- Click on the Increase List Level button in the Paragraph group on the Home tab:

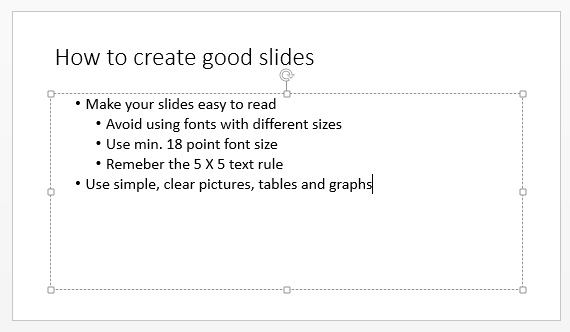
- When you finish the paragraph and press Enter, the program will assume that you want to stay on the same level. The following image shows two indentation levels:
- You can return to the previous level by clicking on the Decrease List Level button.

Deleting slides from a presentation
You can remove one or several slides form a presentation at once.
To delete slides with PowerPoint:
- Bring the slide into view.
- Press the Delete or Backspace button on your keyboard. Alternatively, click the slide with your right mouse button and click Delete slide.
Reordering slides
You will often find that you need to change the order of the slides in your show. Most programs offer different methods to delete slides.
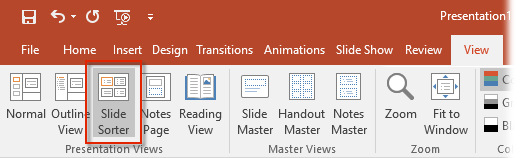
With the Slide Sorter View button on the View tab in the ribbon menu, you can go to a slide-sorter view with minimized images of your slides (see image below).
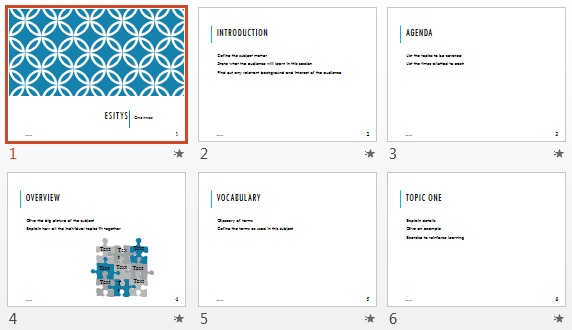
The following image shows this view, where it is easy to change the order of slides by selecting the slide to be moved, grasping it with the mouse and dragging it to where you want it. Release the mouse button where you want to place the slide.
Using images in slides
Though most slide-show programs contain ready-made slide templates for showing images, you can insert any number of images to any slide in your presentation. The images can be created with different applications, captured on-screen, scanned or even so-called ClipArt drawings. The image file formats that are generally supported are jpeg, bmp and tiff, among others.
If you want to add a certain picture to all the slides, you can use the settings for the master (For more information about slide masters, see chapter P.4 Slide shows – Slide masters and design templates). This way you do not have to edit each slide individually. However, do not fill your presentation with meaningless images and other graphics, but try to keep it clear and concise.
Inserting an image
P.4 Inserting and reducing an image -text equivalent
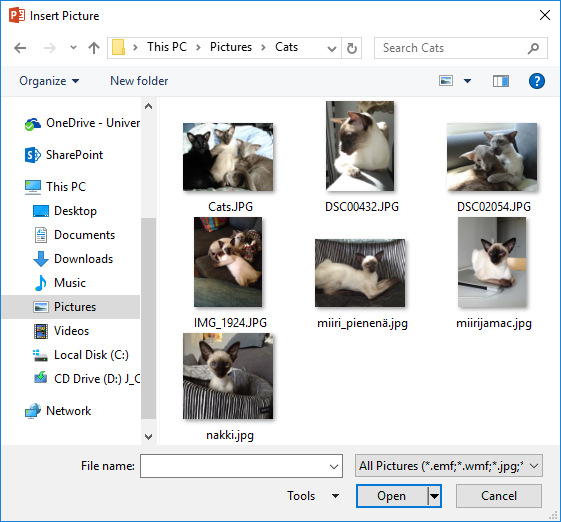
You can import any pictures you have on file (e.g. jpegs). You can insert images by selecting Pictures from the Illustrations group on the Insert tab and browse for the image file in the menu window that opens. Select the image and click on Insert.
Keep in mind that inserting an image can increase the file size of your presentation remarkably. if you are using images in your presentation, please check how much storage space it is using from time to time.
Reducing image size
One way to reduce the storage space needed for your presentation is to compress the images. You can reduce the image resolution (For more information about resolution, see chapter P.1 Common types of data presentation – Images and drawings) with compression according to the following options:
- Compression for slide shows and online shows: the image resolution is set to 150 dpi
- Compression for printing: the image resolution is set to 200 dpi
If you have cropped the image, the program has hidden the part you have cropped. When the image is compressed, this part is deleted, reducing the image size even more.
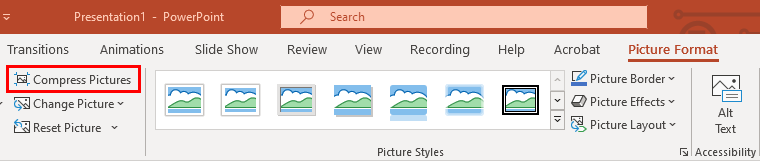
To compress an image with PowerPoint:
Select the image you want to compress from your presentation. Open the Picture Format tab. Click the Compress Pictures button in the Adjust menu:
The following menu window will appear; under Apply only to this picture, you can select which images to compress. Set the purpose of the image under Target Output. You can also select whether you wish to permanently delete cropped areas from the image. Accept by clicking on OK.
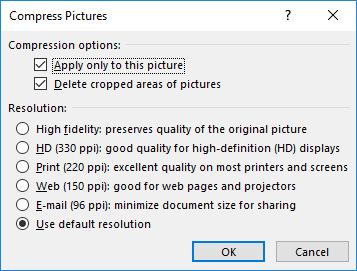
When you have accepted the changes you will get a message saying that compressing them will affect the image quality. When you click on Apply, the program will compress the images and the storage size of your presentation is reduced.
Cropping images
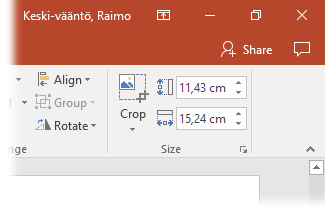
We mentioned cropping images above. though it is usually best to crop an image with the image processor, you can also crop them with the slide-show program.
Start by selecting an image. Open the Picture Format tab. On the Size toolbar, select Crop. You can crop the handles that appear at the edges and corners of the image by dragging the mouse or, alternatively, select Crop to Shape from the Crop menu if you want to use a predefined crop pattern. Click outside the image area to accept the cropping.
Other presentation applications
There are many great progammes online for creating presentations, free or paid, such as Sway included in Office 365 tools, Adobe Spark and Prezi.