This section covers creating screen capture videos in two different ways using the programmes offered by the university. As an example, let’s suppose you have made a PowerPoint slideshow as a course paper as described in the previous chapter. Now, the teacher wants everyone to give their presentations as video presentations, because for some reason it is not possible to hold a traditional seminar during the course. Instead, the participants will watch and assess the presentations in the Moodle area of the course.
Screen capture video with Zoom
Perhaps the easiest way to make a screen capture video is to simply use the recording function of one of the video communication tools – here we will go over how to make a screen capture in University Zoom. To do this, you must install the Zoom client software. Instructions for installing. logging in to and using Zoom are available from Helpdesk.
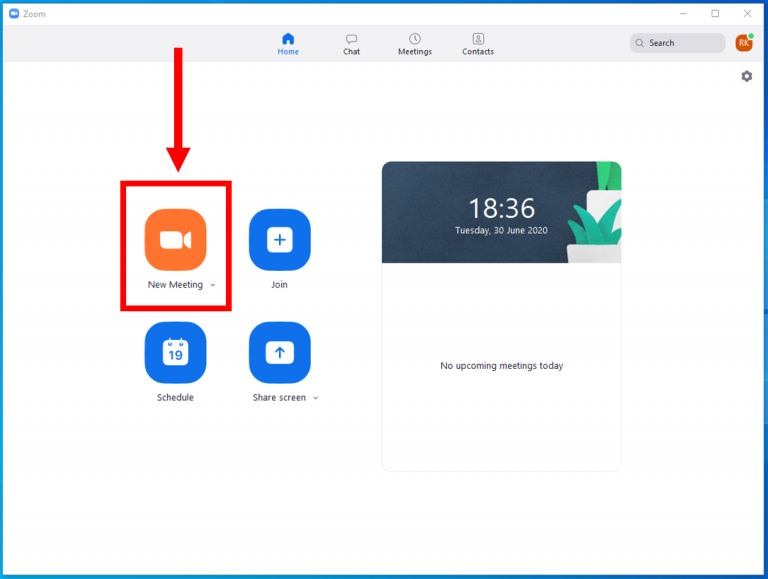
- In the application, start a new meeting with yourself (New meeting) by using your personal meeting room, for example.
- Check that your voice is heard (Unmute) and that the video is also on (Start Video), if you wish.

- If you wish to display your own video, adjust the recording layout, i.e. how you want your camera image to appear in the recording. It can be on top of the shared screen view in the top right corner or next to it in its own window on the right, leaving a little less space for the screen image. You can set this in the Recording tab in Zoom’s settings. Please also see Zoom’s own instructions about recording layouts.
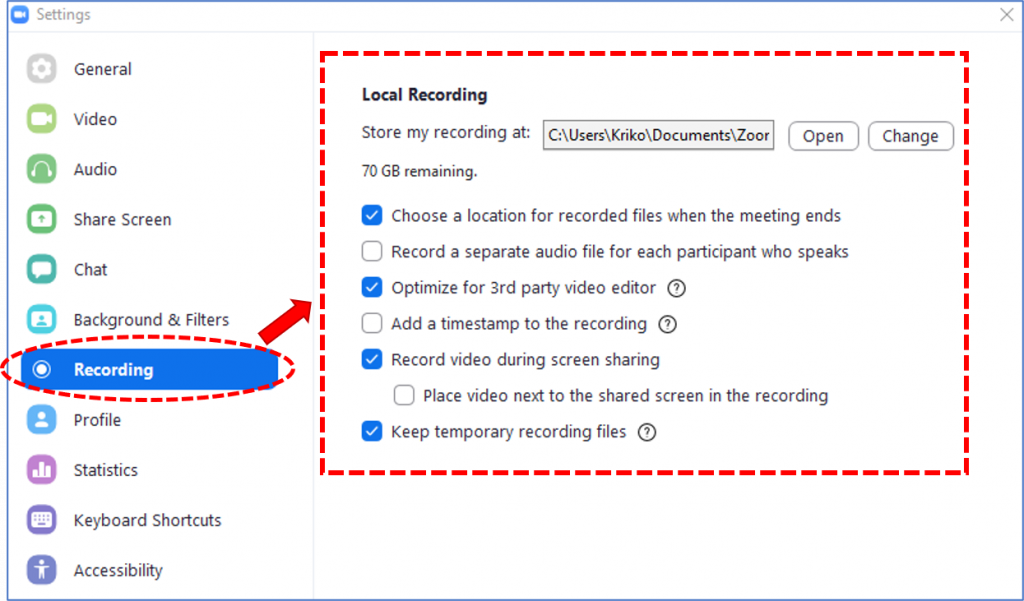
- Start recording from the Recording -button and choose between Local or Cloud recording. You can see the local recording on your own computer afterwards more quickly, while cloud recording is more stable for longer videos. Read more about these differences in the Helpdesk instructions.
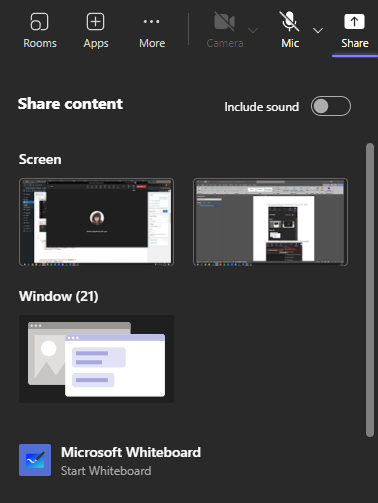
In Zoom, you can share either a specific program or the entire screen. Please keep the following in mind when sharing:
- If you share the full screen, everything taking place on the screen will be visible in Zoom and in the recording.
- If you share a specific program, only what happens in that program is visible in Zoom and in the recording.
Screen capture video in Teams
Another easy way to make a screen capture video is to use the University’s Teams. To do this, you must install the Teams application. Instructions for using Teams are available from the IT Helpdesk.
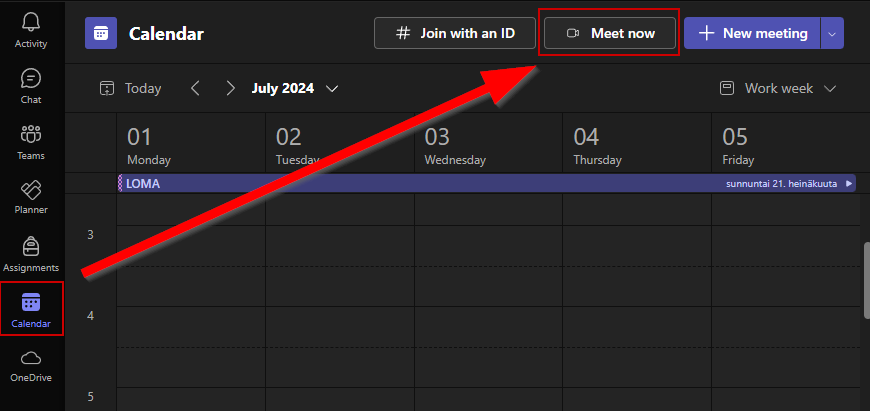
- In the application, start a new meeting with yourself by choosing Calendar and then Meet now.
- Check that your voice is heard (Microphone) and that the video is also turned on (Camera), if desired.

- In Teams, you can share either a specific program or the entire screen.
- Please keep the following in mind when sharing:
- If you share the full screen, everything taking place on the screen will be visible in Teams and in the recording.
- If you share a specific program, only what happens in that program is visible in Teams and in the recording.
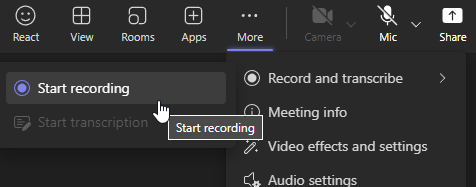
- Finally, select More, Record and transcribe and Start recording.
Screen capture video with ScreenPal
An actual screen capture programme offers a bit more flexibility for producing videos, and also doesn’t require you to be online like Zoom and Teams mentioned above. The university offers a paid version of ScreenPal (formerly Screencast-o-matic) for this purpose. Installation and operation instructions of ScreenPal can be found on the Helpdesk website.
P.6 Screen capture with ScreencastPal – text equivalent
The above video covers the basics of recording a video using ScreenPal.
- Log in to ScreenPal and start the editing software following the Helpdesk instructions
- Press the Record button in the upper right-hand corner

- The actual screen capture view with tools will now appear in a floating box on your screen. First, choose the area of the screen to be captured by dragging the edges of the striped box, or select a standard size from the Size menu and fit the programmes on your screen to it (recommended). Note – if Max Time is limited to 15 minutes, you are using the free version of ScreenPal – you need to login with your university credentials to access the unlimited recording time, see the Helpdesk instructions again for this.
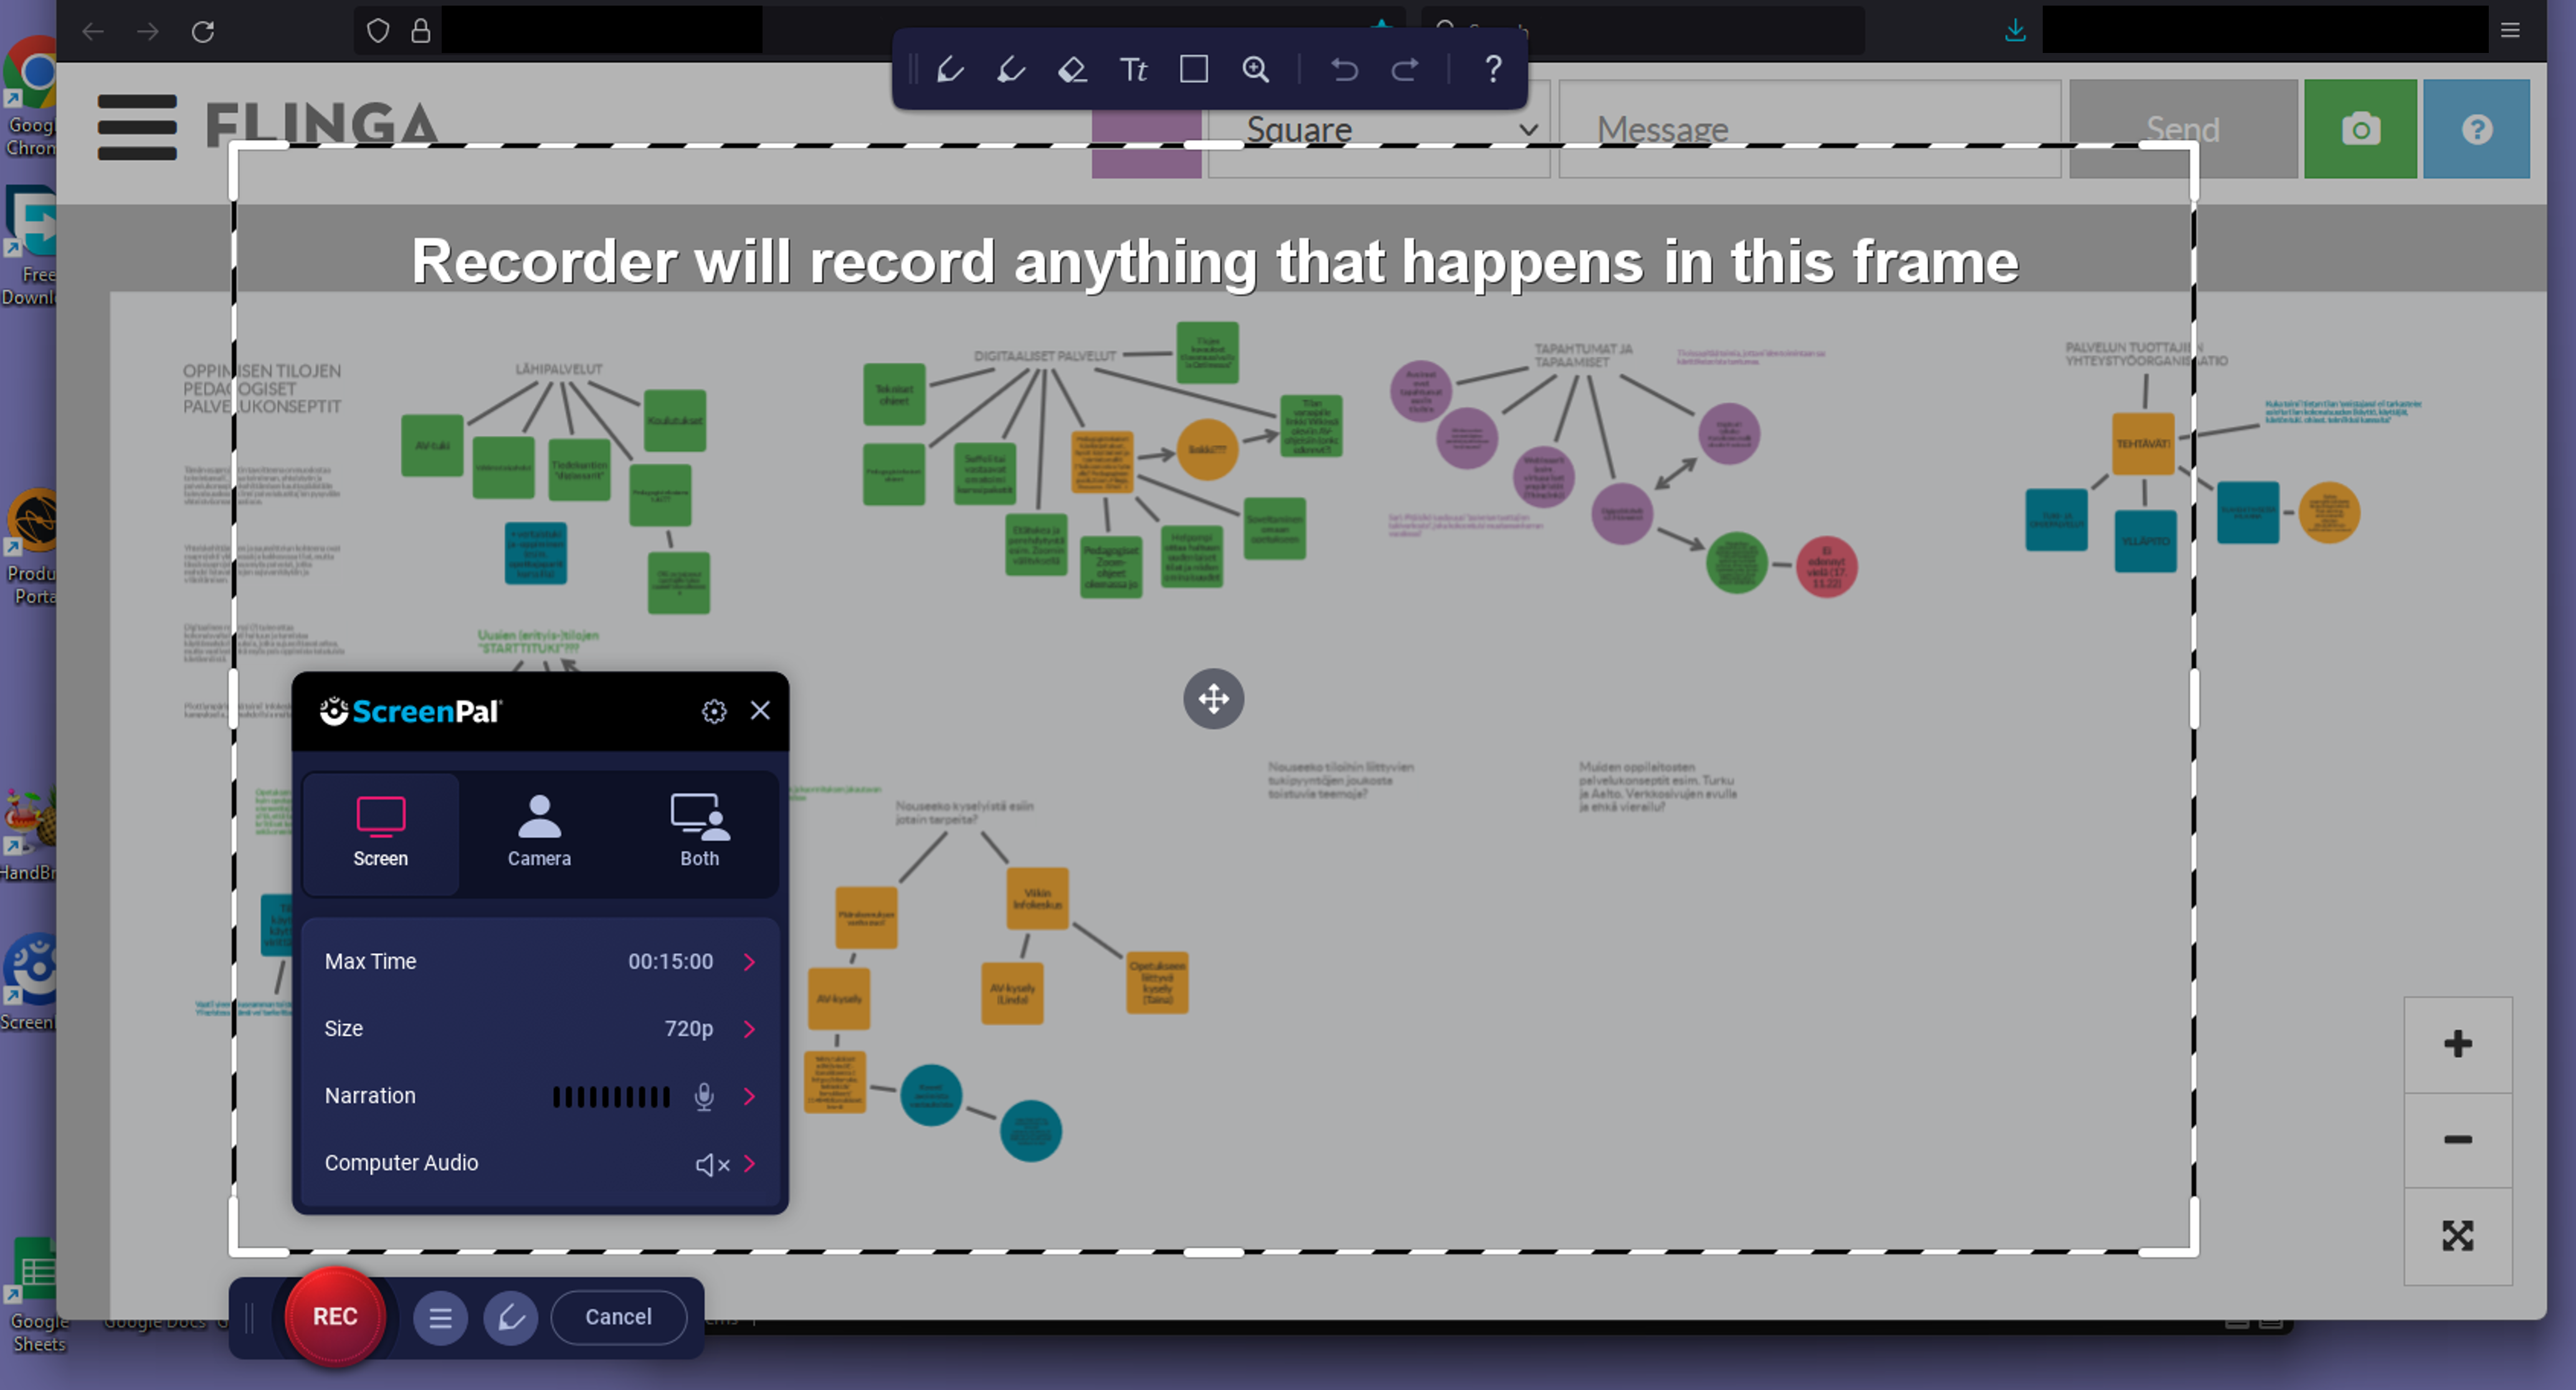
- Choose whether you want to include the screen, webcam or both. The location and visibility of the webcam image can be modified later in editing mode, so you can easily record the camera window and think about the optimal size/layout afterwards.
- Under Narration, check the desired microphone and make sure the green bars move, indicating that your sound can be heard, if you are going to record your speech while presenting.
- When you are ready to start, click the red Rec button – you get a 3 second countdown and then the recording begins.

- To stop or pause the recording, press the now blue Pause-button

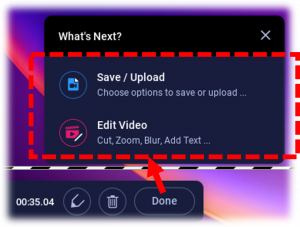
- If you press Rec again after the pause, the recording will resume from where it stopped. You can also view what you have recorded part with the Play If you have recorded multiple scenes using Rec and Pause, you can jump between them with the arrow buttons on the right side of the timer. Use the Delete button to start over. If the recording is successful and you want to keep it, press Done.

- After clicking Done, you can the filename to save your video with or export it directly to a publishable file (Save / Upload), or switch to editing the video (Edit Video).
Now, the recording will appear in ScreenPal’s main view among your other recordings or imported videos as a ScreenPal video project. Remember, that these ScreenPal video projects always need to be saved as video files when you want to use them elsewhere! Click on a project to access the Save or Edit -functions again.
Alternative screen capture programs
Open Broadcaster Software (OBS) is a widely used and versatile free programme for screen capture video. Getting started with it requires a bit more getting used to compared with ScreenPal, but it works very well and is available for Windows, Mac and Linux operating systems.
The OBS project web site: https://obsproject.com/.
P.6 Screen capture with OBS – text equivalent
You can also create screen capture videos with Microsoft PowerPoint. Detailed instructions can be found in section P.4 Creating a video with PowerPoint.
The easy-to-use Xbox Game Bar is worth a try for Windows 10/11 users as it is included in the operating system. It was originally designed to make streaming videos of games but is also suitable for other types of video.